Introduction to Augmented Reality with AR.js and A-Frame
Last Updated: May 4, 2020
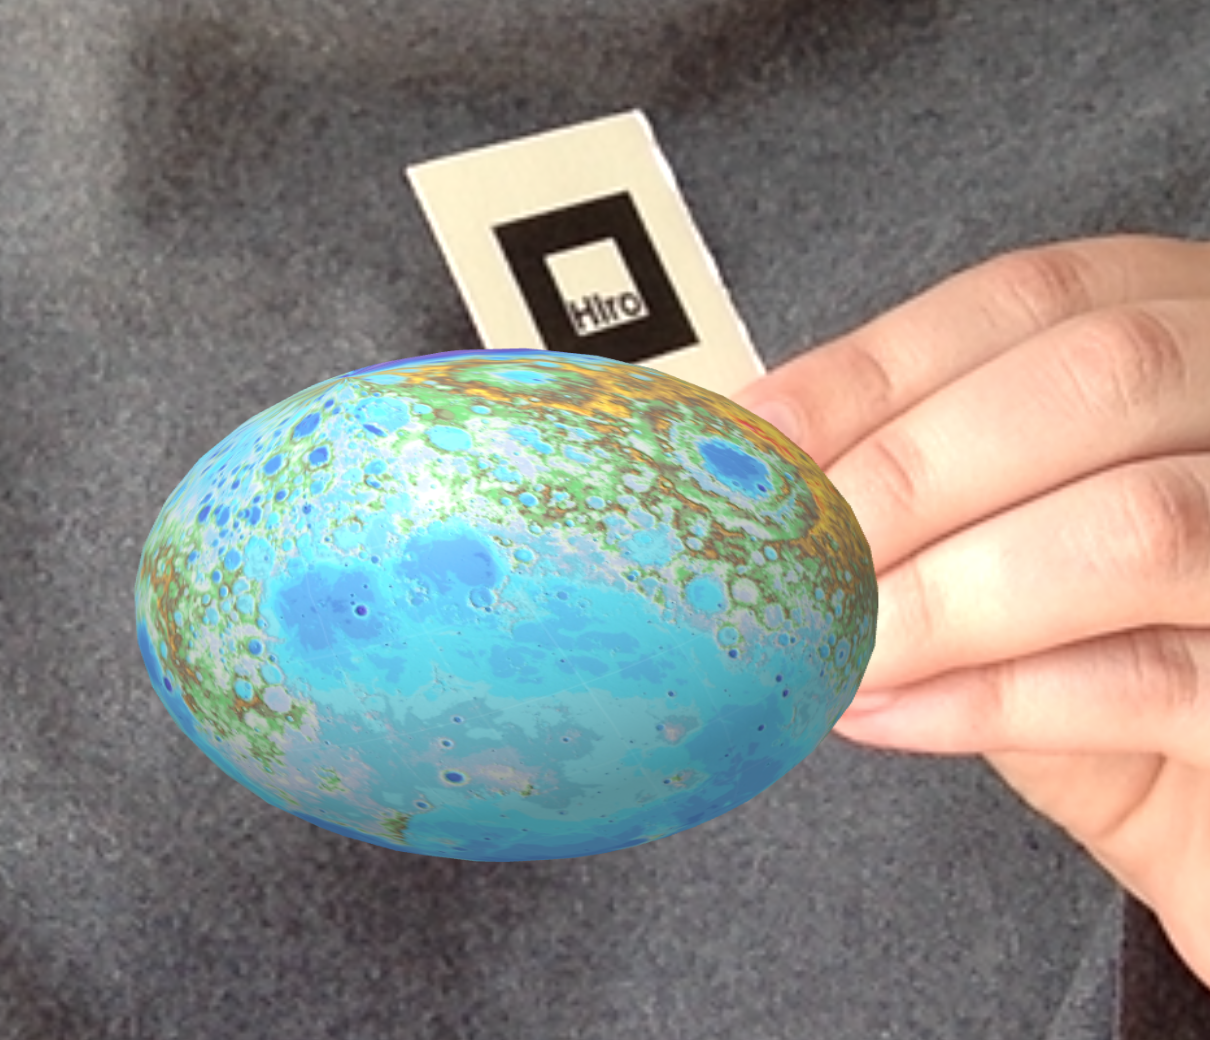
This tutorial will teach you how to make a simple, marker-based AR application that looks like this:
1) Print this hiro marker:

It should be around 1 inch.
If you don't want to print it, you can display it on another screen.
2) Start a new Glitch project
2.1) Go to glitch.com.
2.2) Click on "New Project" and "hello-webpage".
2.3) In the box on the left, delete all of the files except index.html and assets.
2.4) Delete all of the text in the index.html file. We want to start from scratch.
3) Add head and body tags
In index.html, open and close head tags and body tags by writing the following:
<head>
</head>

<body>
</body>
4) Add links to AR.js and A-Frame
Between the head tags, add links to a-frame and ar.js:
<head>
  <script src="https://aframe.io/releases/1.0.2/aframe.min.js"></script>
  <script src="https://raw.githack.com/jeromeetienne/AR.js/2.2.2/aframe/build/aframe-ar.js"></script>
</head>

<body>
</body>
5) Start an A-Frame scene
5.1) Inside the body tags, add a-scene tags:
<head>
  <script src="https://aframe.io/releases/1.0.2/aframe.min.js"></script>
  <script src="https://raw.githack.com/jeromeetienne/AR.js/2.2.2/aframe/build/aframe-ar.js"></script>
</head>

<body>
  <a-scene>
  </a-scene>
</body>
5.2) Inside the a-scene tags, add a-asset tags:
<head>
  <script src="https://aframe.io/releases/1.0.2/aframe.min.js"></script>
  <script src="https://raw.githack.com/jeromeetienne/AR.js/2.2.2/aframe/build/aframe-ar.js"></script>
</head>

<body>
  <a-scene>
  <a-assets>
  </a-assets>
  </a-scene>
</body>
6) Add marker tags
Below the a-assets tags, add marker tags for a hiro marker:
<head>
  <script src="https://aframe.io/releases/1.0.2/aframe.min.js"></script>
  <script src="https://raw.githack.com/jeromeetienne/AR.js/2.2.2/aframe/build/aframe-ar.js"></script>
</head>

<body>
  <a-scene>
  <a-assets>
  </a-assets>

  <a-marker preset="hiro">
  </a-marker>

  </a-scene>
</body>
7) Add a shape to the marker
7.1) Inside the a-marker tags, add a-box tags:
<head>
  <script src="https://aframe.io/releases/1.0.2/aframe.min.js"></script>
  <script src="https://raw.githack.com/jeromeetienne/AR.js/2.2.2/aframe/build/aframe-ar.js"></script>
</head>

<body>
  <a-scene>
  <a-assets>
  </a-assets>

  <a-marker preset="hiro">
    <a-box color="red"></a-box>
  </a-marker>

  </a-scene>
</body>
7.2) Run your glitch app by clicking on "show" in the upper left and "in a new window".
7.3) You can also try it out on your phone by going to the url of your glitch project in your phone's browser.
7.4) If necessary, give the site permission to access to your camera.
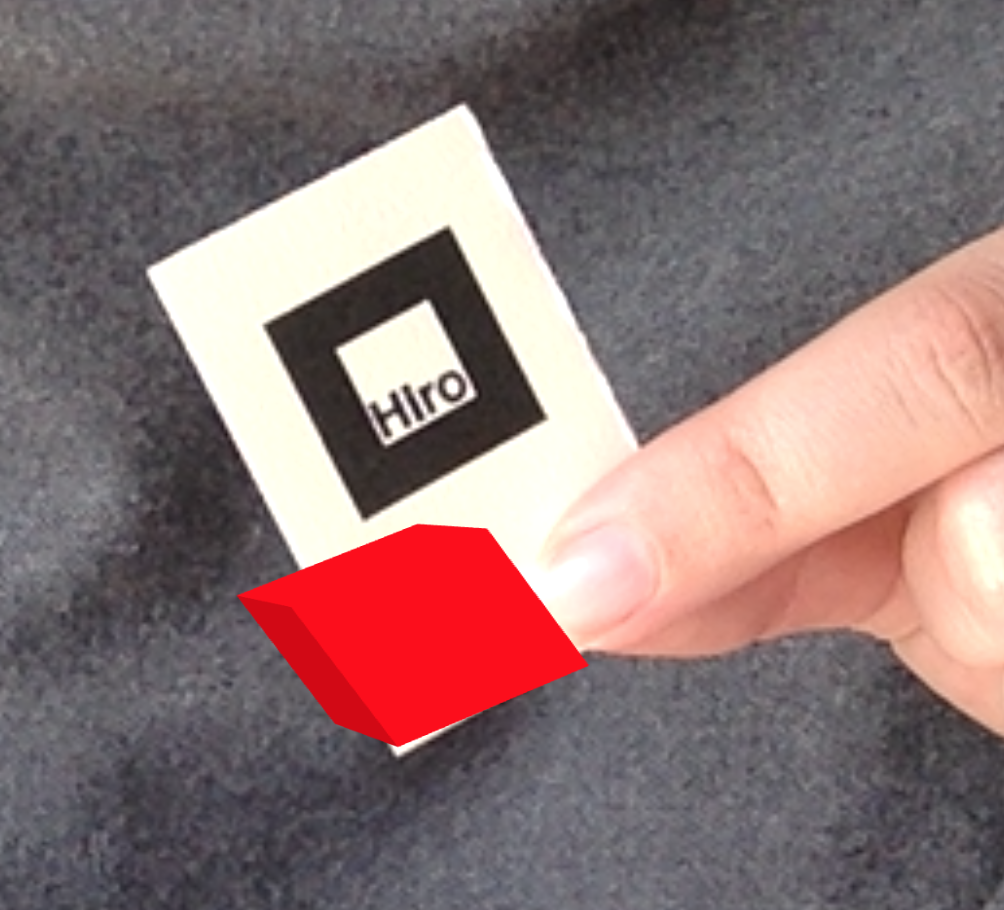
7.5) Hold your printed marker up to the camera. On your screen, you should see a red cube floating near the marker, like this:
8) Turn the cube into a globe
8.1) Change the a-cube to an a-sphere and remove the color:
<head>
  <script src="https://aframe.io/releases/1.0.2/aframe.min.js"></script>
  <script src="https://raw.githack.com/jeromeetienne/AR.js/2.2.2/aframe/build/aframe-ar.js"></script>
</head>

<body>
  <a-scene>
  <a-assets>
  </a-assets>

  <a-marker preset="hiro">
    <a-sphere></a-sphere>
  </a-marker>

  </a-scene>
</body>
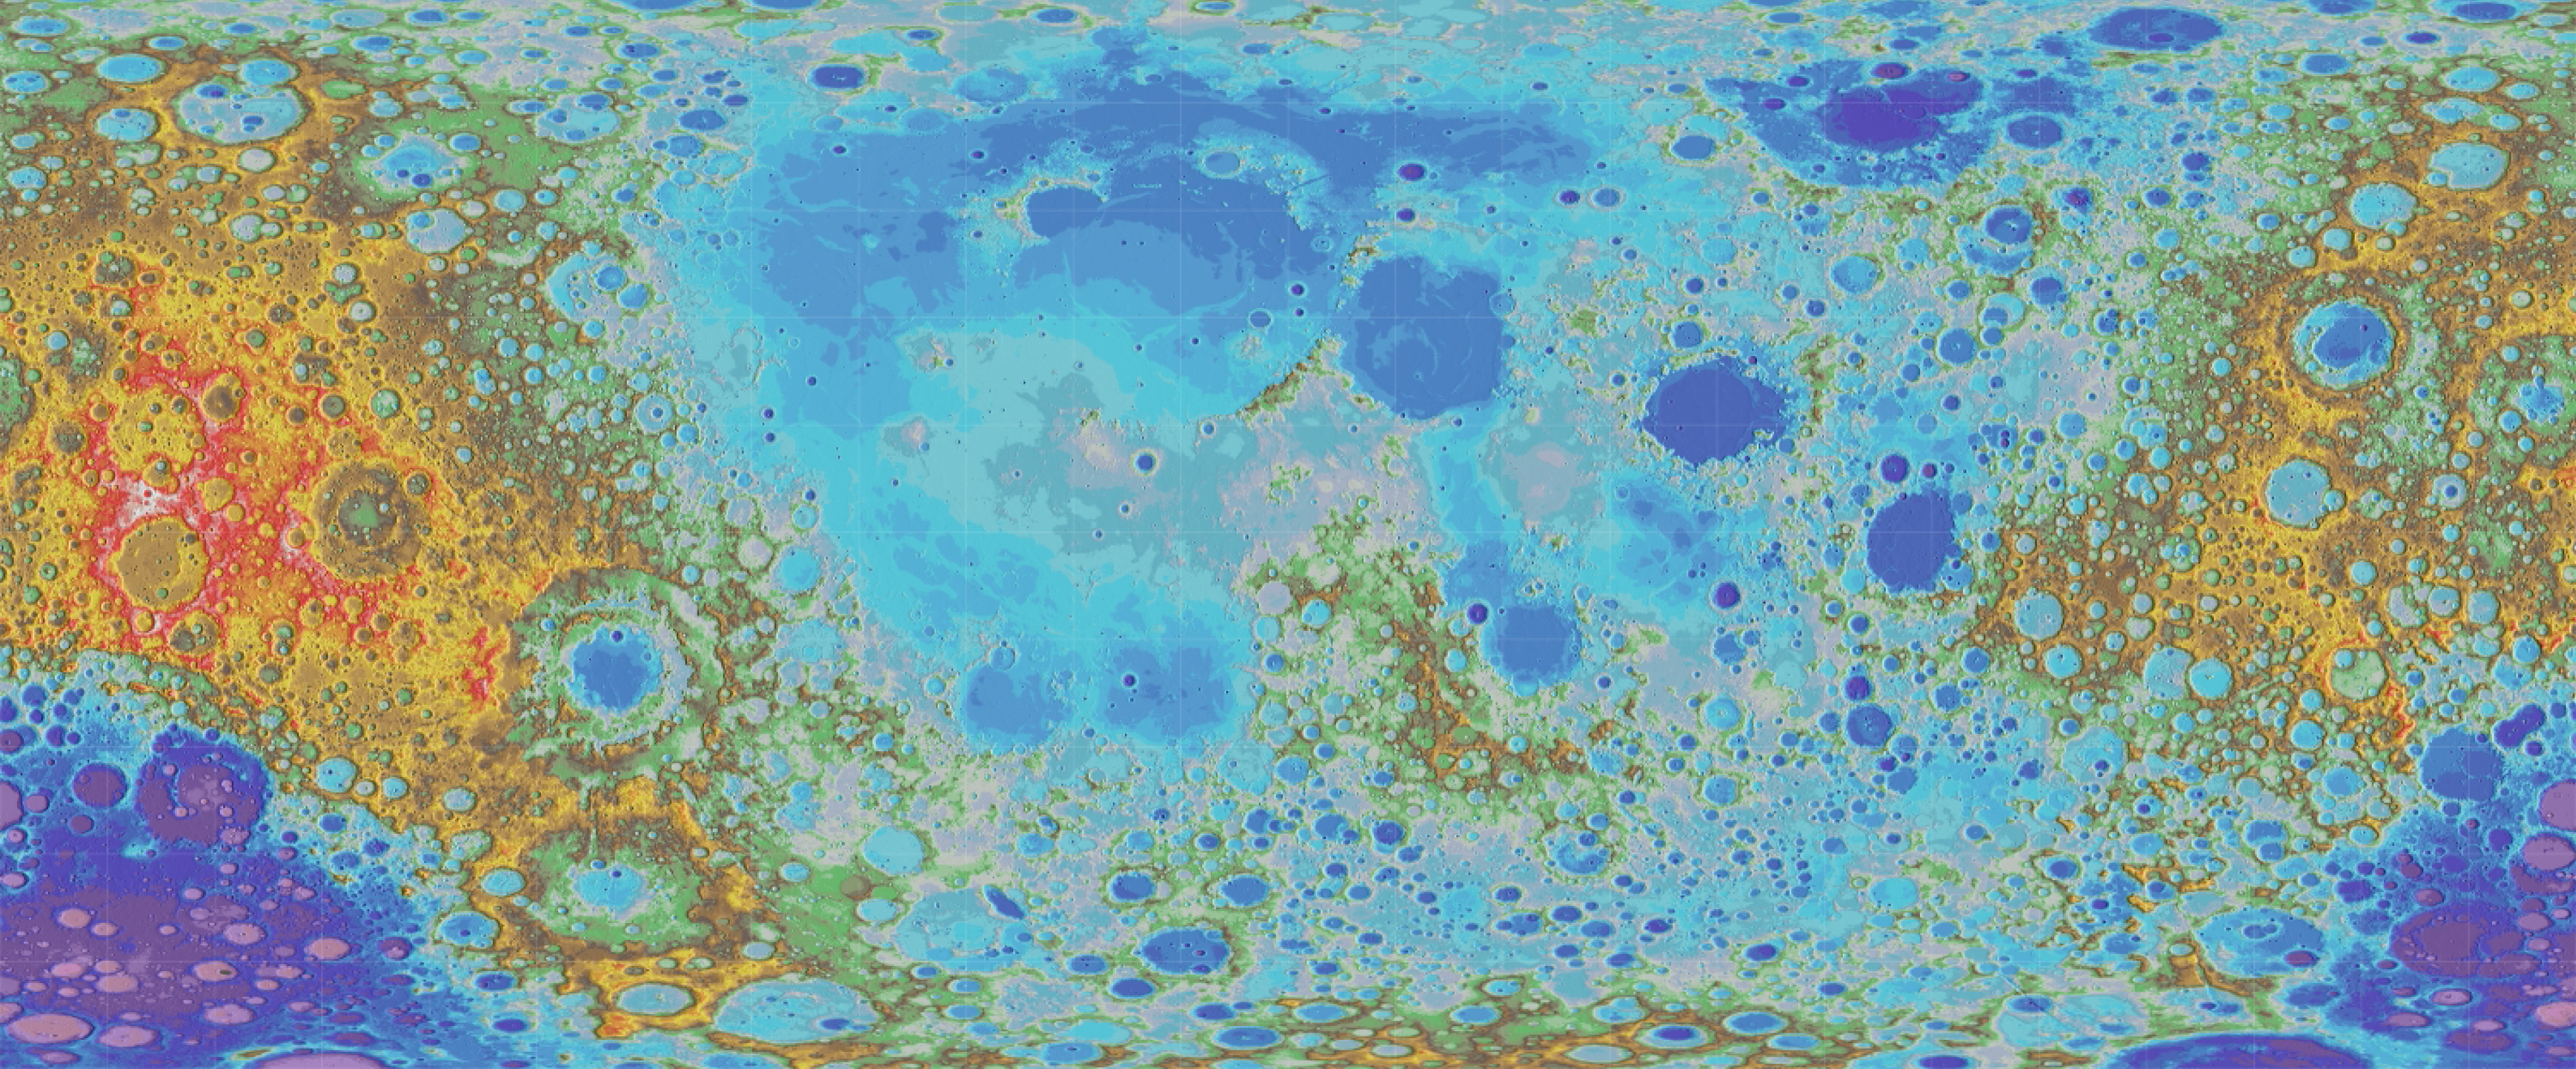
8.2) Go to the assets folder on the left and upload an equirectangulal image like this one:
8.3) Go back to index.html and add an image tag between the a-assets tags, leaving the image source blank:
<head>
  <script src="https://aframe.io/releases/1.0.2/aframe.min.js"></script>
  <script src="https://raw.githack.com/jeromeetienne/AR.js/2.2.2/aframe/build/aframe-ar.js"></script>
</head>

<body>
  <a-scene>
  <a-assets>
    <img id="moon" src="">
  </a-assets>

  <a-marker preset="hiro">
    <a-sphere></a-sphere>
  </a-marker>

  </a-scene>
</body>
8.4) Go back to the assets folder, click on your image, and copy the url.
Then go back to index.html and paste the url between the quotation marks in src="":
<head>
  <script src="https://aframe.io/releases/1.0.2/aframe.min.js"></script>
  <script src="https://raw.githack.com/jeromeetienne/AR.js/2.2.2/aframe/build/aframe-ar.js"></script>
</head>

<body>
  <a-scene>
  <a-assets>
    <img id="moon" src="https://cdn.glitch.com/583c53d8-129b-4cee-b167-34bc3d11db85%2Fglobe.jpg?v=1588643356276">
  </a-assets>

  <a-marker preset="hiro">
    <a-sphere></a-sphere>
  </a-marker>

  </a-scene>
</body>
8.5) Add the image to your sphere as a material:
<head>
  <script src="https://aframe.io/releases/1.0.2/aframe.min.js"></script>
  <script src="https://raw.githack.com/jeromeetienne/AR.js/2.2.2/aframe/build/aframe-ar.js"></script>
</head>

<body>
  <a-scene>
  <a-assets>
    <img id="moon" src="https://cdn.glitch.com/583c53d8-129b-4cee-b167-34bc3d11db85%2Fglobe.jpg?v=1588643356276">
  </a-assets>

  <a-marker preset="hiro">
    <a-sphere material="src:#moon"></a-sphere>
  </a-marker>

  </a-scene>
</body>
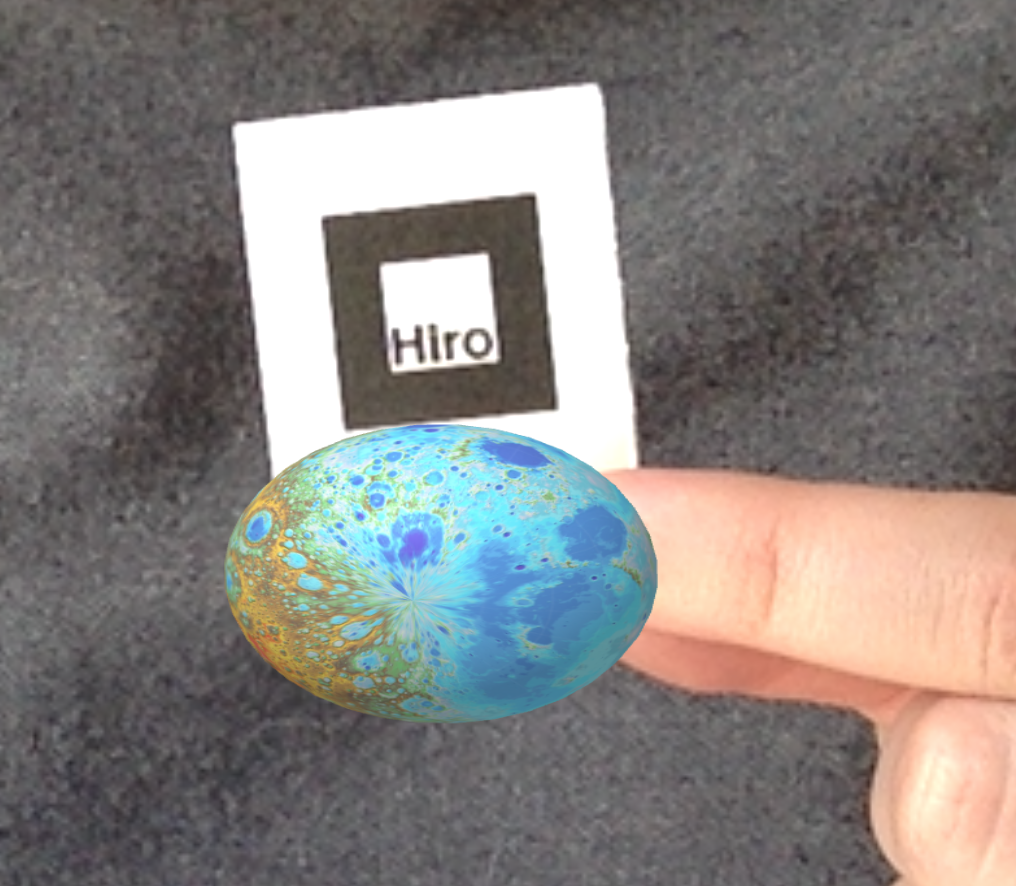
Your project should now look like this:
9) Change the scale, rotation, and position of your sphere:
<head>
  <script src="https://aframe.io/releases/1.0.2/aframe.min.js"></script>
  <script src="https://raw.githack.com/jeromeetienne/AR.js/2.2.2/aframe/build/aframe-ar.js"></script>
</head>

<body>
  <a-scene>
  <a-assets>
    <img id="moon" src="https://cdn.glitch.com/583c53d8-129b-4cee-b167-34bc3d11db85%2Fglobe.jpg?v=1588643356276">
  </a-assets>

  <a-marker preset="hiro">
    <a-sphere material="src:#moon" scale="2 2 2" rotation="0 90 90" position="0 1 0"></a-sphere>
  </a-marker>

  </a-scene>
</body>
Your project should now look like this:
10) Make your globe spin
10.1) Inside the opening a-sphere tag, add an animation for the sphere's rotation:
<head>
  <script src="https://aframe.io/releases/1.0.2/aframe.min.js"></script>
  <script src="https://raw.githack.com/jeromeetienne/AR.js/2.2.2/aframe/build/aframe-ar.js"></script>
</head>

<body>
  <a-scene>
  <a-assets>
    <img id="moon" src="https://cdn.glitch.com/583c53d8-129b-4cee-b167-34bc3d11db85%2Fglobe.jpg?v=1588643356276">
  </a-assets>

  <a-marker preset="hiro">
    <a-sphere material="src:#moon" scale="2 2 2" rotation="0 90 90" position="0 1 0"
      animation="property:rotation; from:0 90 90; to:360 90 90; dur:3000; easing:linear; loop:true;"
    ></a-sphere>
  </a-marker>

  </a-scene>
</body>
Now, when you look at your project, the globe should be spinnng.
10.2) Try changing the "to" and "from" values for the rotation, and the dur (duration), easing, and loop values to see what happens.
10.3) Try animating other properties, like scale and position.
You learned how to make an AR app!
If you want to add different markers, try using this marker generator.
To learn more about A-Frame for AR, check out this blog post.